NDC bookings
Tip: Tap or select an image in the steps below to view it full sized.
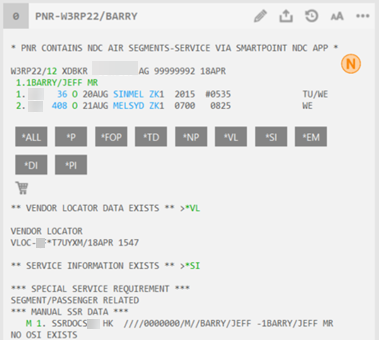
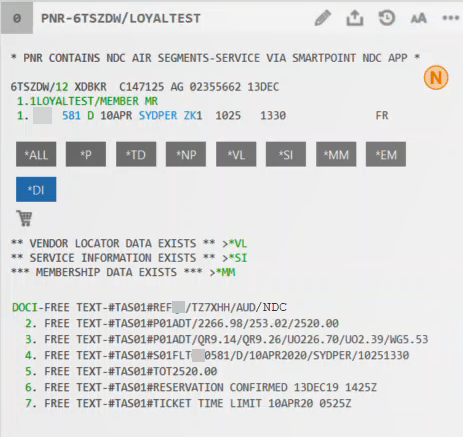
Retrieve an NDC booking. When an NDC booking is made, a passive booking is created and displayed in Smartpoint.
-
When an NDC booking has a schedule change, an orange warning banner advises the new flight details, different to the passive booking in Smartpoint.
-
The segment code ZK indicates an NDC booking.
-
Select the *VL button to display the airline locator. Like a traditional booking if there is NO airline vendor locator then the booking may not have transmitted to the airline, so please contact the airline to confirm.
-
Select the *SI button to display the SSR information entered in the traveler form.
-
Select the *DI button to view payment, document, base fare, tax, and ticket time limit information.
NDC icons
The NDC icon indicates the status of the booking. This status also displays when you hover over the icon.
The NDC icon only displays in the PNR Viewer.
-
 in orange displays in the following scenarios:
-
If the NDC segment's status is confirmed (ZK), and the PNR is non-ticketed.
-
If the NDC segment's status is confirmed (ZK), the PNR is ticketed and an Involuntary change has been received.
-
-
 in green indicates the NDC segment's status is confirmed (ZK), the PNR is ticketed, and the ticket number is in the DI remarks.
 -
 in gray displays in the following scenarios:
-
If all NDC segments are flown.
-
If the booking has been canceled.
-
-
 in red indicates the booking is invalid.
NDC booking schedule changes
For Travelport+, queue 11 on the host is a dedicated queue for NDC booking schedule changes. When an airline has a schedule change, it is automatically placed on Queue 11.
For Apollo, schedule changes are placed on queue 22. For Worldspan, schedule changes are placed on queue 7.
Agent next steps
If the agent retrieves the booking in the NDC plugin, an orange banner displays the new flight times for that booking and the passive segment details are automatically synchronized.
Note: The schedule change remains on queue until the agent takes action. The banner is removed after the initial notification and does not display when the booking file is opened again.

The American Airlines schedule changes process is as follows:
-
American Airlines books the customer on the next best flights and reissues the ticket(s).
-
The schedule change falls into the agent's queue.
-
If the customer is not happy with schedule change, call American Airlines to obtain a waiver code that you can use to modify the flights within the plugin. Refer to Apply waiver code for more information.
-
If American Airlines is called and a change goes through this process, this will break the connection and information will not be returned into the NDC PNR in Travelport. AA should not charge a fee if the customer calls direct.
-
The schedule change information will show up in the DI lines (Travelport+), Ticketing Remark lines (1V), or Remark lines (1P).
-
If AA needs to issue tickets, they do the reissue, and the new ticket number will show up in the DI, Ticketing Remark, or Remark lines.
Apply waiver code
Following an involuntary schedule change, agents (subject to airline support) can apply an optional waiver code to avoid any penalties or fees. See Order Change Notifications (OCN) for details around applying waiver codes.